The year 2016 is almost over. Some said that 2016 would be the year of Virtual Reality. In fact, some big name companies released their VR headsets: HTC Vive, Oculus Rift, Sony PlayStation VR, Samsung Gear VR, Google Daydream View. It seems that the sales of this year aren’t as good as their expectations, but it’s thought to be growing towards 2020. It’s probably the right time to have an interest in VR. This post is the rerview of 5 best VR headset 2016.
HTC Vive
HTC Vive is a VR headset developed by HTC and Valve Corporation. It was released in April 2016. HTC Vive provides “Room Scale” technology. You can use your room as 3D VR space. Two laser position sensors (called Lighthouse) track location and movement of the headset and handheld controllers so you can walk around (up to 15-by-15-foot) and interact with objects in VR by using the controllers. It costs $799 and includes the sensors with mounting brackets and the controllers. With a VR-ready PC, you can start having a premium VR experience.
Oculus Rift
Oculus started developing a VR headset as a Kickstarter campaign in 2012. In March 2014, Facebook bought up Oculus for $2 billion. Then, Oculus Rift was released in March 2016. The headset has an integrated headphone that provides real-time 3D audio effects. Oculus Rift utilizes the headset’s positional tracking system called Constellation. It costs $599 and includes one Constellation sensor and one Xbox One controller. A motion controller called Oculus Touch is sold separately. Constellation system tracks the controllers in 3D space so that you can interact with objects in VR by using the controllers. Oculus Touch costs $199 and consists of a pair of controllers and one Constellation sensor. Constellation can be used with multiple sensors working together. Two sensors (one from the Rift and the other from Touch) track your position, but it’s very limited. If you want Room Scale experience, you will need at least one more sensor ($80). And keep in mind that each sensor needs to be connected to USB port of the PC.
PlayStation VR
PlayStation VR is released in October 2016. It uses a PlayStation 4 game console as a platform. A design of the headset is unique and comfortable. While almost all other VR headset is like a ski goggle, PSVR headset is like a sun visor. A band goes around your head and forehead. Integrated elastic bands make it easy to wear, and a dial on the rear of the band gives a little pressure as a final adjustment. A part that consists of a display and lenses moves horizontally, so it fits your face without pressure. It costs $399 and doesn’t include anything else but a headphone. You will need PlayStation Camera ($60) to track the headset movement. If you already have a motion controller (PlayStation Move), you should have the camera as well. And, these accessories can also be used for PSVR. Sony released a bundle called PlayStation VR Launch Bundle, which consists of the headset, a pair of Move controllers, Camera, and some demo games for $499. Currently, PSVR provides either sitting or standing VR experience, not Room Scale. And keep in mind that Move controllers are less precise than Oculus Touch or HTC Vive’s controllers.
Gear VR
In collaboration with Oculus, Samsung developed VR headset and released the first consumer edition called Gear VR last year. In August 2016, the new model was released alongside the Galaxy Note 7. Gear VR is different from three headsets above. The headset needs a smartphone placed in the headset and uses it as a display. It doesn’t need any cables to connect, and you can carry around and use it anywhere as long as you have a compatible smartphone. This type of headset is called mobile VR headset. Although there aren’t any wires or cables attached to the headset, you can’t walk around in VR world because there is no sensor to track your position. Gear VR has an integrated touchpad and buttons on its side. It also has built-in sensors, which connects to smartphones via micro USB port. The built-in sensors make more accurate and less latency for rotational tracking than generic mobile VR headsets such as Google Cardboard. As of now, compatible smartphones are Samsung Galaxy S6/Edge/+, S7/Edge, Note 5. Gear VR costs $99, but there is a promotion frequently, like buy Galaxy phone get Gear VR for free.
Daydream View
Daydream View is released in November 2016. It’s a mobile VR headset and compatible with some new smartphones with latest Android OS; Nougat. The headset is made with soft fabric. It looks very compact and stylish. Integrated NFC chip launches a Daydream platform automatically when a phone is placed in the headset. It comes with a wireless controller. To some extent, this controller can interact with VR apps and games. Daydream View costs $79. Currently, there are very limited number of apps and games in Daydream platform, and compatible smartphones are Pixel/XL and Moto Z/Force.
Conclusion
HTC Vive is the best of all. If you already have a powerful PC, $799-package is all you need to start Room Scale VR experience. On the other hand, Oculus Rift, $599-package doesn’t include motion controllers. The controllers (Oculus Touch) costs $199. Rift and Touch include one position tracking sensor each, but two sensors can’t cover enough tracking volume for Room Scale. You will need at least one more ($80) for that. The total cost exceeds HTC Vive’s, but it still doesn’t cover as much tracking volume as HTC Vive does.
One thing that Oculus is better than Vive is the controllers. Unlike Vive’s wand-shaped controllers, Oculus Touch is a very ergonomic and easy to use. You may need little or no time to get used to them. It’s worth noting that Oculus Touch was released very recently (December 2016). So next year, Oculus may be going to release a bundle package including Rift, Touch, and tracking sensors with a reasonable price. And I believe that is the way for Oculus to compete with HTC Vive.
If you have a PS4 game console, PlayStation VR would be a great option for its price. But $399 package doesn’t include any accessories. You need Camera and either a DualShock 4 or Move controller to play VR games. $499 PlayStation VR Launch Bundle includes the headset, Camera, a pair of Move controllers, and some demo games. Please note that its screen resolution is lower than Vive and Rift. And it’s not Room Scale experience. Since it uses a single tracking sensor (PS Camera) placed in front of you, tracking volume is very limited. If you turn around, Camera will lose track of the controllers.
If you don’t like to spend hundreds of dollars on a VR headset, consider a mobile VR headset. If you own Samsung Galaxy or Daydream-ready smartphones, there is no doubt that Gear VR ($99) or Daydream View ($79) are the best. These headsets provide better rotational tracking with less latency than generic mobile headsets. If you own iPhones or different phones or don’t want to spend that much, there are a variety of generic mobile headsets from $15 to $100. For generic headsets, you shouldn’t spend $100 because it’s not worth. You can get a good one for around $30-$50. Just make sure that it has basic features like focus wheel, durable, comfort, etc. And don’t forget to check if your phone is capable of play VR contents beforehand.
See also: What is the Best VR Headset for iPhones 2016?
See also: Is my phone VR compatible? Here is how to check
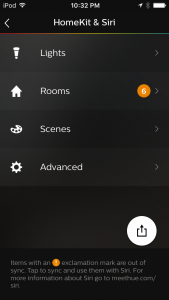 Once you set up a new Bridge, go to HomeKit app on your iOS device. Tap “+” icon and/or “Add Accessory” and you will see an icon of Philips Hue. Tap it and scan or manually enter the 8-digit setup code either on a package of the Bridge or back of the device itself. HomeKit app recognizes all light bulbs with the same names as you set up in Philips Hue app. From this moment on, you can control all lights with Siri individually. However, HomeKit app doesn’t know Rooms yet, which you also created in Philips Hue app. The easiest way of setting up rooms is open the original Philips Hue apps and go to “Setting” then “HomeKit & Siri.” You will see an orange circle with an exclamation mark or number in the section of “Rooms.” It means it’s available to sync with HomeKit app. Tap a white circle and “Resync home”, and HomeKit recognizes Rooms. Now, you can control multiple lights in a room with Siri as well as an individual light.
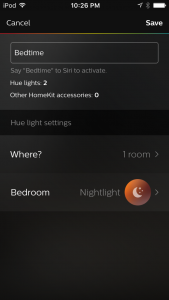 You can turn lights on and off, brighten, dim, and change colors with Siri. You can also change scenes, but you will need to extra steps to do this. If you want Siri to turn on nightlight in your bedroom, you have to create a scene. Tap scene “+” , “Where?” and select a room and go back. Tap [room] and choose a scene. You will see a list of Philips Hue’s default scenes and your original scenes if you have created ones. Say you chose Bedroom, Nightlight and entered “Bedtime” as a name of the scene. Saying “Hey Siri, set bedtime” changes lights in bedroom to nightlight. But it won’t work for other rooms. For example, “Set bedtime in Kids room” or “Set bedtime in Living room” won’t change light in these rooms unless you configure for them. It’s very bothersome because you have to create each scene in each room.
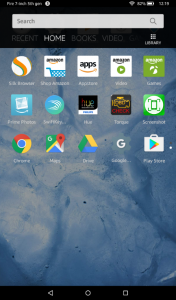 Amazon Appstore doesn’t even have Google’s apps like Chrome, Gmail, Google Drive, and many other useful apps that are normally available on Android devices. And Amazon’s Fire tablet (7-inch, 5th generation) is originally limited to apps from Amazon Appstore. However, there is a way to install Google Play Store app on Fire tablet so you can download all Android apps. Since an operating system of Fire tablets called Fire OS is base on Android, you can do that without rooting.
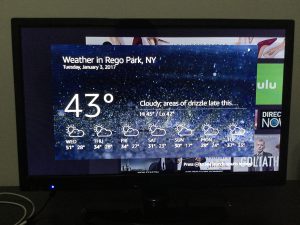 Alexa is an artificial intelligence developed by Amazon. It’s capable of voice interaction and communication such as answering your questions, telling jokes, setting the alarm, telling news, weather, traffic, and much more. For a couple of years, Amazon Echo, Echo Dot, and Tap have been well known for devices through which you can interact with Alexa, but after recent update of Amazon’s operation system called Fire OS, many Amazon devices have become Alexa-enabled. Now, you can use Alexa with the following devices.
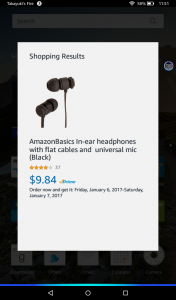 How to use Alexa on Fire tablets
 Any generation of Fire TV and 2nd gen of Fire TV Stick include a voice remote which has a built-in microphone. To speak to Alexa, press and hold a Voice button, and you will see “Listening…” pop up on your TV screen. Then start saying your question or command. Like tablets, Alexa shows you a card for you to see information visually. You can resume the contents by pressing the back button on the remote. 1st gen of Fire TV Stick doesn’t have a voice remote. However, you can use Alexa as long as you updated the operating system. There are two options for owners of 1st gen Stick. First, you can buy
  Amazon Fire TV app is free and available in
  You can make Alexa repeat what you say. Say to Alexa, “Alexa, Simon says” and continue with a word, phrase, or sentence. Alexa will repeat whatever you say. If you have an
 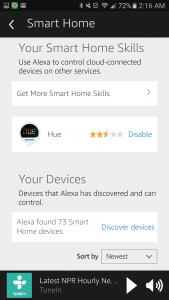 You can now change scenes of Philips Hue lights with Alexa. Before, you were able to turn on and off or brighten and dim the light with Alexa. You can also change color with Siri. Or you can change the scene with Alexa though IFTTT app after you create “Recipes” for each light bulb. But now, thanks to the Skill:
 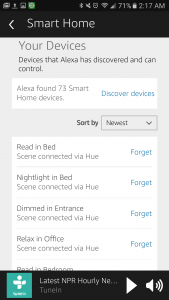 If Alexa says, “This command does not work with device (scene) in (room).” or something similar, try this. Open Alexa app > Tap “Smart Home” > Scroll down to “Your Devices” and tap “Discover devices.” Although you see a list of all scenes and devices in the app, try to discover devices again. But while Alexa is looking devices, press the button of Philips Hue Bridge. Personally, I was told the same message over and over by Alexa and changing scenes didn’t work. But after I pressed the button while searching, it works perfectly.
 Mobile VR headsets use smartphones as a display by mounting it in front of lenses. But, you should know that not all smartphones support VR apps and 360-degree videos. A smartphone should have a Gyroscope sensor to play VR contents. It’s not much about how new a phone is. In fact, there are numbers of new phones that don’t have this sensor. Instead of looking for a spec chart of your smartphone on the internet, there is an easy way to check if your phone supports VR contents.
 Virtual Reality is relatively new technology, and its possibilities are endless. It can be used for a variety of purposes: gaming, movies, 3D, and also educational contents. However, the most of VR headset manufacturers have set age limits. For examples, Oculus Rift and Samsungs Gear VR made a rule of 13 or older. PlayStation VR is not supposed to be used by children under 12. HTC Vive doesn’t have an exact age limit, but it does a warning against a usage by young children.